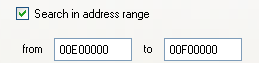
Welcome, Guest. Please login or register.
Did you miss your activation email?
If you don't have MUGEN or don't
know what MUGEN is, read this.
June 19, 2005, 02:29:22 am
Working on tutorials for the How to Develop for MUGEN board. The primary focus of NWM is to become the best source of information for developers. Anyone is welcome to contribute.
345 Posts in 86 Topics by 47 Members
Latest Member: Duneflower
* Home Help Search Login Register
New Wave Mugen  |  M.U.G.E.N  |  Development  |  How to Develop for MUGEN  |  Topic: 04. Ripping Graphics
Pages: [1] Go Down Print
Author Topic: 04. Ripping Graphics  (Read 293 times)
DavidGee
Administrator
Posts: 164
Location: United States
04. Ripping Graphics
« on: May 26, 2005, 08:11:48 am »

This topic weal deal with -- you guessed it -- ripping graphics from games.

Contents:

Off-site Resources:
Logged
The Dreamslayer
Founder
Posts: 173
But, dude, stolen code. Stolen , Stolen, Stolen.

Interactive Artmoney Tutorial, Part 1
« Reply #1 on: April 19, 2005, 06:21:27 am »

Okay this is going to (hopefully) be the layman-ist tutorial ever Tongue Basically I will start off with a post and some people that want to use artmoney can interact and let me know any problems they have. People that know how to use artmoney can post the next phase of the tutorial but only people wanting to learn to use artmoney should reply saying that they succeeded or had a problem with what was last mentioned. Never tried a tutorial like this but I always thought it may work well. Experiment time. Grin

Download Artmoney.
http://www.artmoney.ru/

This topic is spawned from the same one on Mugen Guild.
http://www.mugenguild.com/forumx/index.php?topic=23907.0
Logged

The Dreamslayer
Founder
Posts: 173
But, dude, stolen code. Stolen , Stolen, Stolen.

Interactive Artmoney Tutorial, Part 2
« Reply #2 on: April 19, 2005, 06:23:05 am »

Let's get this thing started. I'll direct link from Joram's site on a few things Tongue
The next 2 pics and information come straight from Joram's tutorial's page. (main site) There is no reason to remake these as he did an excellent job describing the images :yes:


Quote from: Joram"Zwei Fuss" Nowak
The marked areas on the screenshot are of importance and I'll just briefly describe them here:

1 - 'Search' - Search will be used to look for values in memory. This will only be used the first time you search for a new value, every new search for this value will be searched for using the 'Filter' button.

2 - 'Filter' - This is used after 'Search' is used once. It filters the searches down based on certain criteria, which will be expanded on later.

3 - 'Process Selector' - Using the pull-down menu here, select the running Chankast process. This tells ArtMoney which process to search in.

4 - 'Found Addresses Window' - If you tell ArtMoney to do so, it will dump all the found addresses in here. Usually it's not a good idea to do this at the very start of the search, as thousands of unintelligable values will be dumped here on the first search.

5 - 'Address Editor Window' - Here is where you'll be editing the addresses. The arrows between these two areas push all the values to this window. The top one puts the selected values in the left window to the right, while the bottom one puts all of them in.

6 - 'Load' - This loads up an ArtMoney table. I will provide you with some that I have done, with help from JJWE for some addresses.

7 - 'Save' - Save the table once the values have matched up with your PC. This will be explained later.

Now if you want to mess around with options go ahead. I'll highlight the areas of interest for you

Quote from: Joram"Zwei Fuss" Nowak
In the 'Additional' Tab, The top portion played a great role for me when I was ripping 'non-flashing' Gill way back when I first started using ArtMoney. But after I discovered the animation test method, I sort of disregarded this part. Either way, I found the values above for refresh-time and freeze-time to be good enough to hold the freeze on Gill to prevent him from altering his colour. You see, if these values aren't low enough he would rapidly switch between colours even if I had his colour address frozen! This happened because as the game was feeding him his new palette, ArtMoney wasn't quick enough to turn it back to the value I had frozen. So that's why they have to be low to work. The bottom box I highlighted is useful if you want to see the addresses in Hexadecimal mode. It's just nice sometimes to be able to see how the game works, because this is much closer to actual program code than the Integers we will be using.
Logged

The Dreamslayer
Founder
Posts: 173
But, dude, stolen code. Stolen , Stolen, Stolen.

Interactive Artmoney Tutorial, Part 3
« Reply #3 on: April 19, 2005, 06:24:44 am »

Now that you have learned what everything is and how to set some options up lets go to what I usually start off doing when I first get a game.

Trying to find the 1st value the fastest. The fastest easiest value to generally find in a fighting game is the timer.

So load up SFA3 on kawaks and select the game from the list in artmoney.


Now get to the fight.


Click "SEARCH" in artmoney.

Go to custom and set artmoney to only search for 1 and 2 bytes.


Since in the SFA3 image above the timer is at 99 before we begin the search we want to search for that exact value.


Now click "OK" to begin the search.


Now let the clock go down to 98 in the game.


This time you will push "FILTER" and search for the exact value 98.


You will find 1 value.


Add it to the list on the right with either arrow. The Red arrow will add whatever is selected and the green arrow will add everything.


Now you can name that value whatever you like and save it so you will always have it. You can alter the value 99 to be any number and the timer will change correspondingly.


If you want to freeze the timer all you simply have to do is click to the left of the name under the "F"

This wraps up this part of the tutorial. Feel free to ask questions I don't want to leave anyone behind.

In the next post I will tell why finding this value 1st will help save you time on future values and we will find Ryu's X and Y axis.
Logged

The Dreamslayer
Founder
Posts: 173
But, dude, stolen code. Stolen , Stolen, Stolen.

Interactive Artmoney Tutorial, Part 4
« Reply #4 on: April 19, 2005, 06:25:49 am »

Go back to this step and change the search to only find values of 2 bytes.

We won't be needing 1 bytes anymore since we are not going to search for anymore exact values.

Now look at the time's address.


Generally all the game data you will be looking for will now be near this number. So instead of lengthy searches and thousands of results to filter through let's try to narrow it down abit.
Go to options>Searching and I will search in between the range of 00000000 and 02000000


If by chance I can't find the timer on some games or the game does not have a timer *cough* Melty Blood *cough* I locate the X axis as default instead. Now we have a range to look in it shouldn't take too long to find.

Go to "SEARCH" again.
This time we will look for an unknown value.

Search away.

After it finds all possible take player 1 (Ryu) and move him to the right abit.

                                     V

In every game I have tried so far walking to the right increases the value and walking to the left decreases it so you can mix these up to filter down the values to be more tolerable.


I found 1279 values. That is way too many so I will move Ryu again.

Move Ryu (or homever you are) to the left and right filtering for increased valus and decreased values accordingly. You may also unpause the game and keep Ryu still and filter for a value that "was not changed". I filtered about 7 times and came up with 30 addresses.

I see 2 of these 30 addresses start with 00E so I am almost certain it will be one of these 2 addresses.
I select those two and push the red arrow to only move the selected and I freeze the values.


Notice Ryu cannot move to the left or right. We found the value. Unfreeze one and see if he still sticks. I unfroze value 23 and he still did not move so value 24 is his X axis.
Rename it and save your new table. Now you can manipulate that number and move player 1 around. It will work on any player 1 not just Ryu.


Finding player 1's Y axis will be just as easy.
Search again for "Unknown Value"
This time make Ryu jump.
Any time Ryu is going up his value is increasing and any time he is going down his value is decreasing.

So say I jump and pause the emulator and filter for "was increased" when he starts to fall I can filter for "was decreased".

If you just don't make him jump you can filter "was not changed" since his Y axis did not move. You can even move him left and right and filter for "was not changed" because as long as he isn't moving up or down his Y axis is not changing.

I don't think I need images to show this. Just do pretty much exactly like you did when finding the X axis.

Let me know if you do need visual references to help find the Y value. After you find it you can freeze player 1 in the air. Move him around the air with the numbers and have hours of fun  Grin
Remember to always save anytime you find a new value.

These methods will work to find player 2's X and Y values as well.

YAY!

Let me know if you have any questions thus far. The next update will be the part everyone has been waiting for. Freezing animation values to cycle through all sprite. Yipee skippy
Logged

The Dreamslayer
Founder
Posts: 173
But, dude, stolen code. Stolen , Stolen, Stolen.

Interactive Artmoney Tutorial, Part 5
« Reply #5 on: June 03, 2005, 09:02:59 am »

Cycling through the sprites.

I got tired of searching in the large range I showed above. I know all the values will begin with 00E now so I am only gona search in that range. In capcom games I havn't found anything game related outside of the range you find the axis and timer values.

In Melty Blood the screen turning dark effect was FAR away from the rest of the game data so this means narrowing down the searches may not ALWAYS find a certain value depending on how it is stored in certain games.

In every game I have tested the numeric values of the stance are smaller than the duck, which is also smaller than an attack. Knowing this can be very usefull in isolating the sprite and animation values.

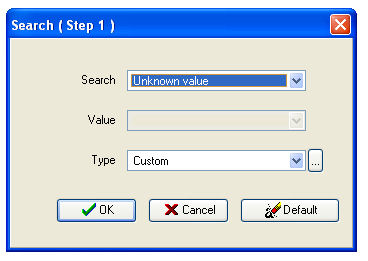
First search for Unknown Value while your player is standing.


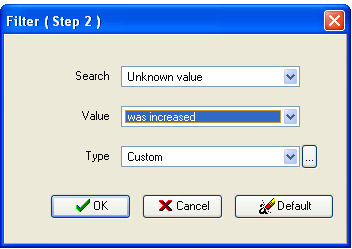
Next make your player duck and FILTER for INCREASED VALUE


Next make your player attack and FILTER for INCREASED VALUE again

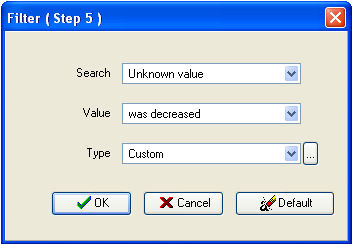
Now go back to duck and FILTER for DECREASED VALUE


Now go back to standing and FILTER for DECREASED VALUE

Now go back to ducking and FILTER for INCREASED VALUE (basically you started over)

Keep repeating these steps till you have narrowed your search down enough for your liking.
Once again you will use the freeze option to find the value

Once you freeze the correct value your player will not move (animate) anymore. They may just kinda jitter as if they are trying to go to their next frame. In some games like for example SF3, SFA3, CVS2 on Dreamcast, SFA3 on PSX, and MB ReAct you can cycle through the sprites while the game is paused. Elliminating the jitter problem.

In some games (such as Melty Blood ReAct) the sprites are set up in two groups. One for animations and one for each frame in those animations.

That means to cycle correctly you will need both values. You will Change animations with one value and change the sprite in each animation with the other value.

If you find yourself missing a lot of frames while cycling from the method I gave above then that MAY be your problem.

Try filtering each frame of a punch or a kick. Frame 1 will be lees than frame 2 and so on.

To cycle through the sprites you will need to know how much a value increases to get to the next frame. With most games this is a fairly fixed amount.

To find this do what I said above. Take a punch or kick and see how much the value increases per frame.

Example:


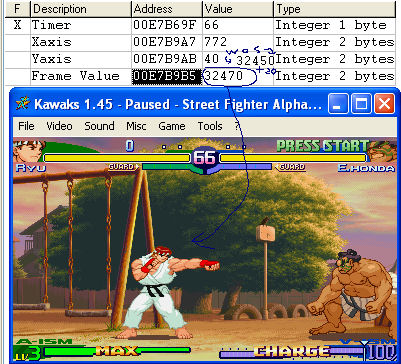
See how in the 1st frame of the punch the last two digits were 50 and then in the second frame of the punch they were 70?
That means that if you add 20 to each value you can go to the next frame.

The easiest way to do this is to make a shortcut button.
You want it to be something that does not interfere with the emulator/game. CTRL+Z or CTRL+X are the two buttons I generally set the most.

Here's how we do this.
Click the integer of the Frame Value.

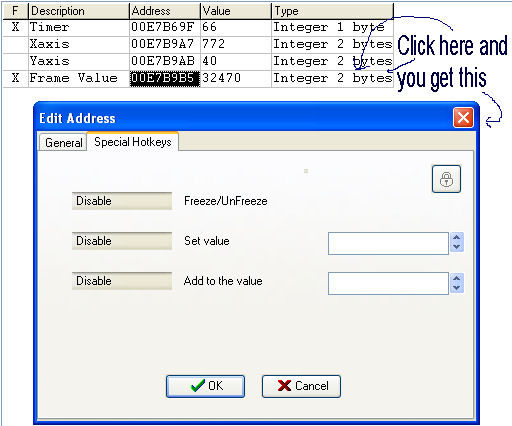
Click disable next to the words "Add to Value" and in the box that appears press the keys you wish to set as the hotkeys.

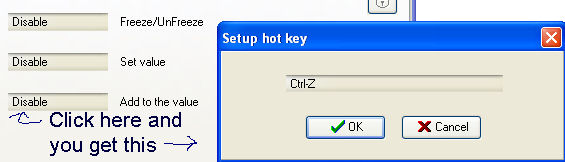
Now just type in the number the value needs to increase eaxh time you press the hotkey. In this case it is 20.
To go back 20 type in -20.

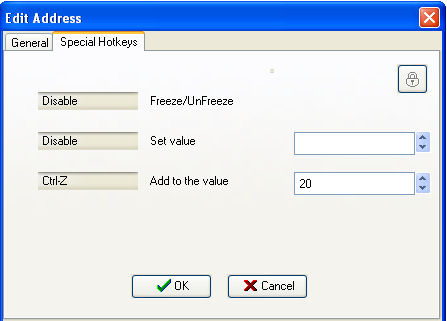
Press OK and you are done. When you save your artmoney table this will be saved as well.

In the next tutorial I will show you how to get rid of that pesky jitter.

Remember to ask if you have any questions.

Oh I almost forgot. In some games every few groups of sprites will crash it once it reaches that group. You may have to find another frame that you didn't get to see where new groups are. For example in Vampire Savior every time you get to a new group and the game resets simply add 4 to the value you was at during the crash and reload.

Keep practicing and you will figure it out. Feel free to add any tips.
« Last Edit: June 03, 2005, 09:19:34 am by The Dreamslayer » Logged

DavidGee
Administrator
Posts: 164
Location: United States
Ripping from Windows Games with VMware Workstation
« Reply #6 on: June 02, 2005, 07:09:27 pm »

Character Creation Walkthrough, Part 1
Ripping from Windows Games with VMware Workstation


This is the first part of my character creation walkthrough, where I'll be walking through the entire process of making Sou, the playable character from Blade Warrior. I will explain everything I do to "Mugenize" the character as I go.


Tools used: VMware Workstation, VirtualDub, Paint Shop Pro

The first thing that has to be done, of course, is obtaining the character's sprites. I'll do that by capturing a regular video of the game and taking the sprites out of that. As far as I know, it's not possible to capture video from this kind of game (full screen Windows 95 games) simply by using a screen capturing tool such as SnagIt, as you'll end up with a blank screen because the captured video won't use the game's palette. I suppose this problem can be overcome with the right hardware, or there may be other solutions, but I'm not familiar with any. I used VMware Workstation to get my video. This tool allows you to install an OS on a virtual machine on your hard drive and run that OS from a window in your real OS. I installed a copy of Windows on a virtual machine and added the game to it from a CD I burned.

Screenshot 1 - a virtual machine running Windows XP.

Then I just started the game and used the Capture Movie option, which will record the screen of your virtual machine and output it to an AVI video file.

Screenshot 2 - starting a video capture of the virtual machine.

I simply played through the first level of the game, making sure to include all the sprites I would need in the video. In the case of this particular game, it will be very easy to get all the graphics I need from normal screen shots, but for other games, you would probably want to hack their memory or graphics storage if possible to make things easier. After I was finished with the capture, I opened the AVI file with VirtualDub, a free program that allows you to scroll through frames in a large video very rapidly with your mouse's scroll wheel. I used this in conjunction with Paint Shop Pro to save all the screens from the video that I will need as individual images.

Screenshot 3 - the video in VirtualDub.

In PSP, the screen capture commands are found in File-->Import-->Screen Capture. First I set it up to capture "object", or a visual component of an application. Then, I customized the layout of the tools by placing the Start command from the Screen Capture menu on the main menu for easy access. Right-click-->Customize on any toolbar to enter a mode where you can drag tools and commands to other locations. Now, all I have to do is click Start and PSP gets minimized and is ready to make a capture. Then I just right-click and then left-click on the video's screen in VirtualDub to capture the image, and PSP regains focus.

Screenshot 4 - setting up the screen capture in PSP.
Screenshot 5 - customized main menu in PSP.

Now, I repeat that process for each image I'll need and save them as separate images with meaningful names. I use the .pspimage file type simply because it is the default (so I just need to click the disk icon and type a name in the Save As dialog). Also, this is a lossless format, so no image data will be lost. Never use image compression formats like JPG for MUGEN development. I will use the Batch Process tool to convert them all at once later.

Screenshot 6 - saving stand.pspimage in PSP.
Screenshot 7 - saving slash-up1.pspimage in PSP.

I noticed that some instances of particular animations were missing frames that were included in other instances. I don't know if this is the game's fault or VMware Workstation's fault, but I made sure to double check everything to ensure that I wasn't missing any frames. Anyway, once I was finished saving all the images I needed, I used PSP to convert them all to the PCX format that MUGEN uses. From the menu choose File-->Batch-->Process to get the dialog. Click the Browse button to select all of your images, choose New Type for Save Mode, and choose ZSoft Paintbrush (*.pcx) for Type. Make sure that Use Script is not checked, as we aren't running any scripts on the images. I chose an empty new folder for the output folder so that I could simply delete the folder with the .pspimage files after the job is over. Just click the Start button, and your image conversions are made.

Screenshot 8 - Batch Process dialog in PSP.

The next step, "cleaning" the rips -- or removing the excess so that we only have the actual character sprites, is covered in Part 2: Cleaning Rips with PSP Scripts.
Logged
Pages: [1] Go Up Print 
New Wave Mugen  |  M.U.G.E.N  |  Development  |  How to Develop for MUGEN  |  Topic: 04. Ripping Graphics
Jump to:  

Powered by MySQL Powered by PHP New Wave Mugen | Powered by SMF 1.0.3.
© 2001-2005, Lewis Media. All Rights Reserved.
Valid XHTML 1.0! Valid CSS!